Dugan-ish Coffee Cake

[image: slice of coffee cake]

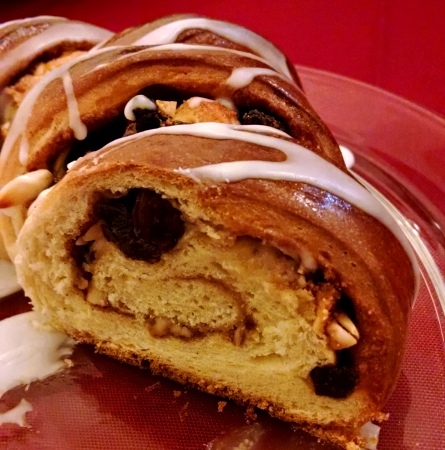
Happy birthday to my mom! She requested I make a coffee cake that she remembered from her childhood. She said the Dugan’s Man used to come around the house selling breads and cakes, and her father’s favorite was a coffee cake with cinnamon, almond paste, and raisins. She rarely got to eat it because it was her dad’s and You Do Not Touch Carl’s Stuff.

She found this recipe on Simply Recipes, thought it looked right, and asked me to make it. I did, and it turned out really, really well. So well, in fact, that I’m considering making it again this weekend. (It’s really good.)

My mom says it’s almost exactly like the coffee cake she remembers from the Dugan Man. So: Dugan-ish Coffee Cake.

For more information about the Dugan Brothers’ Bakery:
The Baby Boomer eMuseum
The Old Motor
Roadfood.com Discussion Board
New York Times (subscriber access only)

Dough:
1/2 cup whole milk
1/4 cup butter (half a stick)
1/4 cup granulated white sugar
1/2 tsp ground cardamom
1 package yeast (2 1/4 tsp) dissolved in 2 Tbsp warm water
2 cups AP flour, plus extra
1 large egg, lightly beaten
1 tsp kosher salt
vegetable oil

Filling:
1 Tbsp butter, melted
2 Tbsp brown sugar, packed
1/2 Tbsp granulated white sugar
1 tsp cinnamon
dash of table salt
1/2 cup raisins
1/4 cup slivered almonds
2 Tbsp almond paste (like 30 grams by weight. ish)50 grams of almond paste (it tastes better with more)

Egg wash:
1 large egg yolk
1 Tbsp whole milk

Sugar glaze:
1/2 c powdered sugar
1 Tbsp water
dash of table salt

Scald the milk (heat in a pot over medium heat until steaming but not boiling) and take off the heat, then stir in the butter, sugar, and cardamom. Pour into the bowl of a stand mixer (or a mixing bowl if kneading by hand). Stir in the yeast mixture and egg by hand, then add in the salt.

Add one cup of flour to the bowl. Attach the dough hook and turn the mixer on low. Once incorporated, gradually add the second cup. Turn the mixer up to medium speed. Add more flour if necessary. You want the dough to pull away from the sides of the mixer, but keep the dough soft. (I added another 1/4 cup flour to mine.) Run the mixer for 5 minutes, or knead by hand for 5-7 minutes.

Place the dough in an oiled bowl and cover with plastic wrap. Let rise in a warm, draft-free place for an hour or until doubled in size.

Turn the dough out onto a work surface dusted with flour. Press dough out into an 8-inch by 16-inch rectangle. (If it fights you, let it relax for 5 minutes and give it another go.)

Brush the dough with the melted butter, leaving a half-inch border around the edges. Mix together the sugars and cinnamon with a dash of table salt, then spread evenly over the dough. Sprinkle the raisins and almonds evenly over the dough. Either tear the almond paste into little bits and distribute them evenly or roll the paste out into a very, very thin sheet and drape over the dough.

Starting at the back, slowly and carefully roll the long end up towards you. Flatten the seam on the bottom as well as you can, then transfer to a baking sheet lined with parchment paper. Shape the tube into a ring and work the ends together.

Using kitchen shears, cut the dough most of the way through at about 1-inch increments on a slant. Pull each piece out or into the circle, alternating. It will look (vaguely) like a wreath.

Cover with plastic wrap and place back in your proofing spot for a half hour.

Heat the oven to 350. Whisk the egg and milk together, then brush over the dough. Bake for 30 minutes.

Carefully remove to a rack and let cool completely. Whisk together powdered sugar, water, and a dash of table salt to make a glaze. (Add more water or powdered sugar if the glaze is too thick or thin.) Drizzle over cooled pastry in zig-zags.

Serve in sliced with a smear of softened butter (and maybe an extra sprinkle of salt if you’re me).

Made a cinnamon/raisin/almond coffee cake for my mom's birthday. Gotta let it cool before I can glaze it.

A photo posted by sarah (@braisinhussy) on

Victory Spinach

[image: baked spinach]
[image: baked spinach]

This past weekend, I basically begged an invitation from Lydia for something, ANYTHING, to keep my mind off tomorrow’s election. She very kindly invited me over for dinner on Sunday. She and her husband were making miso-marinated flat iron steak, so she asked me to bring a side. I decided on spinach, because creamed spinach is one of the classic sides at old school steakhouses. I didn’t end up using a cream-based recipe, but this was a really pleasant surprise. Using frozen spinach made it much easier. I squished the defrosted spinach in a colander using my hands to get out all the liquid. Wrapping it all in a black kitchen towel and wringing it out would also work (my dad’s recommendation) (otherwise you’ll dye the towel green).

There’s no reason behind the recipe name. I’m just hopeful for tomorrow.

GO VOTE!

2 lbs frozen chopped spinach, defrosted and squeezed dry
4 Tbsp butter, divided (2+1+1)
1 1/2 Tbsp AP flour
1/2 tsp table salt
pepper, to taste
2/3 cup stock
1 cup grated Parmesan cheese, divided
1/4 cup panko breadcrumbs
1 tsp assorted chopped herbs (thyme, basil, oregano, parsley—whatever’s lying around) or 1/2 tsp dried Italian herb mix

Butter a 9×9 baking dish (or use nonstick spray) and heat the oven to 375.

In a large saucepan or pot, melt 2 Tbsp butter over medium-high heat. When foaming, add spinach. Stir and cook for 2-3 minutes, or until the residual moisture from the spinach has evaporated. You can tell when this happens by when the spinach starts to stick (if you’re using not a nonstick pan) or by the sound of the sizzle—it will start to sound noticeably different.

Sprinkle the flour on top and turn the heat to low. Stir and cook for 2 minutes. Slowly (in a trickle) stir in the stock. Once added, simmer for 1 minute and stir in an additional 1 Tbsp of butter. If you think the mixture seems too thick, add up to an additional 1/3 cup stock. Stir in salt and add pepper to taste (I put in like 8 grinds).

Transfer the spinach from the pan to the baking dish. Carefully mix in 1/2 cup Parmesan cheese. In the now-empty pan, melt the remaining 1 Tbsp butter. Add the panko breadcrumbs and herbs. Stir until just barely toasted. Sprinkle on top of the spinach along with the remaining 1/2 cup Parmesan cheese.

Bake at 375 until heated through and browned on top, about 30-35 minutes.

Fudgey Brownies

[image: brownie]
[image: brownie]

These are very sweet and very fudgey. Also they make kind of a hell of a mess. I don’t know if the original writer (I think this was from the Chicago Tribune, but I just have a really old photocopy a family friend passed along) thought that pulsing chocolate chips and sugar in a food processor would remain entirely contained, because a fine mist of choco-sugar coated the countertop after I was finished.

Nonstick spray
8 oz. semisweet chocolate chips
2/3 cup white sugar
3/4 cup butter (room temperature)
2 eggs
1 Tbsp vanilla
1/4 cup flour
1/4 tsp baking powder
1 rounded tsp kosher salt
1/2 cup chopped walnut pieces, toasted
4 oz. white chocolate chips

Prepare a 9-inch square baking dish with nonstick spray and turn the oven to 325.

Place the semisweet chocolate chips and sugar in a food processor and pulse 8-10 times to combine, then turn on and keep running until the chocolate is the same consistency as the sugar (about 30 seconds).

Add the butter, eggs, and vanilla to the food processor. Mix for a minute, scraping down sides as necessary. Add the flour, baking powder, and salt and mix to combine.

Add the walnuts and white chocolate chips and pulse until barely incorporated (3-5 pulses).

Transfer the batter to the prepared baking dish. Bake until tester inserted in center comes out with moist but not wet crumbs, 45-55 minutes. Cool in the pan, then chill until firm, about 4 hours. Cut into small squares (they’re intensely chocolatey, a small amount is enough) and serve.

Cranberry Upside-Down Cake

Brain hemorrhage of a cranberry upside-down cake.

A photo posted by sarah (@braisinhussy) on

So I set out to make a nice autumnal cake for our family gathering today that would use up the cranberries we bought for the dessert I made the last time we had a family gathering. What I made was kind of a horror show. A deliciously tasty horror show, but jesus, look at that photo. It is not pretty.

The buildup to the unmolding was also not pretty. This cake is supposed to bake in a 9-inch cake tin. We had 2 8-inch cake tins that were pretty shallow and that I feared would not hold all the batter. So I opted for a 9 1/2-inch springform pan. DO NOT USE A SPRINGFORM PAN. I wrapped the bottom of the tin in foil to fend off leaking, and…

Springform pan leakage. Crud.

A photo posted by sarah (@braisinhussy) on

Well, that clearly worked. Ugh. So maybe half of the caramel made it into/onto the final cake. Plus, my brother and his family were greeted by the smell of burning sugar! How joyous.

That being said, if you use the correct pan, you won’t have any of these issues. I cannot guarantee that the cake won’t still end up looking like surgery gone bad! The cranberries are deliciously tart, and the cake is moist and has a nice little kick of brandy. Feel free to sprinkle a little extra (1-2 Tbsp) over the cake after you unmold it. (We were serving it to kids, so I didn’t.)

nonstick spray
2/3 cup packed light brown sugar
1 Tbsp honey
10 Tbsp butter, divided (4 and 6)
1 1/2 cups AP flour
2 tsp baking powder
1 tsp kosher salt
1 cup granulated sugar
2 large eggs
1 tsp vanilla
1 Tbsp brandy
1/2 cup apple juice (this is just what we had, probably some kind of cran-juice would be nice too)
2 cups (8 oz) fresh or frozen cranberries

Heat oven to 350. Grease a 9-inch round cake pan with nonstick spray (DO NOT USE A SPRINGFORM PAN) and cover the bottom with parchment paper

In a medium saucepan over medium heat, melt 4 Tbsp butter. Add the brown sugar, honey, and 1/4 cup water. Bring to a boil, stirring. Once you’re sure all the brown sugar has melted into the mixture, pour into prepared cake pan. Set pan aside.

Whisk together flour, baking powder, and salt in a medium bowl and set aside. Beat 6 Tbsp butter in a large bowl with an electric mixer until light and fluffy, then gradually beat in granulated sugar. Add eggs, then beat in vanilla and brandy. Add half of flour mixture and beat on low speed until just blended. Beat in juice, then add remaining flour mixture, beating until just blended.

Add the cranberries to the prepared baking pan and press the fruit into an even layer. Pour the batter on top and use a spatula to gently nudge it into place without disturbing the cranberries underneath. Bake on the center rack (with a sheet pan underneath in case of any overflow, which shouldn’t be a problem because you were smart and did not use a springform pan).

Bake cake in middle of oven until golden and a tester comes out clean, 45-50 minutes. Let cake stand in pan 5 minutes. Invert a serving plate over the cake pan and invert cake onto plate (keeping plate and pan firmly pressed together). Serve warm or at room temperature.

Chelo with Tahdig (Persian Rice with Crispy Crust)

Damn that's pretty. #rice #chelo #tahdig #notreallyiscreweditup

A photo posted by sarah (@braisinhussy) on

So I made this a couple days ago, and while it is pretty good and absolutely GORGEOUS (just look at that photo!), it’s… just not what I wanted. I kept wanting it to be Fatty Rice. The only thing the two preparations really have in common are the fact that you get that layer of fried crispy rice which is amaaaaazing but with the Fatty Rice, you get a ton of flavor from the chicken drippings and garlic and onion and everything, and with this, you get mostly rice flavor—which I mean, you’re using basmati, it’s a nice flavor. It’s a much purer, cleaner feeling rice dish. You’re not going to hate yourself as much.

That being said, it’s really oily (and not the deliciously flavored fat of Fatty Rice, just vegetable oil-oily) and the preparation is pretty fussy. I didn’t even try to serve this properly. You’re supposed to flip the pan upside down and get the crunchy layer out in one piece. Since I did this in an cast iron Dutch oven, that was not going to happen.

Recipe included for posterity, but I don’t know if I’ll be making this one again.

2 cups basmati rice
Table salt
1 Tbsp plus 1/4 cup vegetable oil
1/4 cup plain Greek yogurt or full-fat sour cream
1 1/2 tsp cumin seeds
2 Tbsp butter, cut into 8 cubes
1/4 cup minced fresh parsley

DIRECTIONS

Place rice in fine-mesh strainer and rinse under cold running water until water runs clear. Place rinsed rice and 1 Tbsp salt in medium bowl and cover with 4 cups hot tap water. Stir gently to dissolve salt; let stand for 15 minutes. Drain rice in fine-mesh strainer.

Meanwhile, bring 8 cups water to boil in Dutch oven over high heat. Add rice and 2 Tbsp salt. Boil briskly, stirring frequently, until rice is mostly tender with slight bite in center and grains are floating toward top of pot, 3 to 5 minutes (begin timing from when rice is added to pot).

Drain rice in large fine-mesh strainer and rinse with cold water to stop cooking, about 30 seconds. Rinse and dry pot well to remove any residual starch. Brush bottom and 1 inch up sides of pot with 1 Tbsp oil.

Whisk remaining 1/4 cup oil, yogurt, 1 tsp cumin seeds, and 1/4 tsp salt together in medium bowl. Add 2 cups of the parcooked rice and stir until combined. Spread yogurt-rice mixture evenly over bottom of prepared pot, packing it down well.

Stir remaining 1/2 tsp cumin seeds into remaining rice. Mound rice in center of pot on top of yogurt-rice base (it should look like small hill). Poke 8 equally spaced holes through rice mound but not into yogurt-rice base. Place 1 butter cube in each hole. Drizzle 1/3 cup water over rice mound.

Wrap pot lid with clean dish towel and cover pot tightly, making sure towel is secure on top of lid and away from heat. Cook over medium-high heat until rice on bottom is crackling and steam is coming from sides of pot, about 10 minutes, rotating pot halfway through for even cooking.

Reduce heat to medium-low and continue to cook until rice is tender and fluffy and crust is golden brown around edges, 30 to 35 minutes longer. Remove covered pot from heat and place on damp dish towel set in rimmed baking sheet; let stand for 5 minutes.

If you are brave, attempt to serve this in one piece by flipping over the pot and praying that it all comes out. If you are not, like me, spoon the hill of rice out into a serving platter and mix in 2 Tbsp parsley and salt to taste. Then scoop out the crust in pieces and place atop the rest of the rice, sprinkling with the rest of the parsley and more salt.

Baingan Bharta (Roasted Eggplant Curry)

[image: baingan bharta over rice]
[image: baingan bharta over rice]

If you are familiar with how baingan bharta is supposed to look, you may be taken aback by the above photo. I had found a recipe where you made the curry, then turned it into a dip. I did this so I’d have a good bread dipping appetizer for my Lady Evening with Lydia last week. It still tasted good over rice after the dip transformation, though.

Recipe originally from The ABCD’s of Cooking, tweaked a bit so I didn’t have to go to the store.

1 medium eggplant, about 1 pound
1 onion
3 Tbsp oil
1/2 tsp turmeric
2 tsp coriander powder
1 tsp cumin powder
1 tsp garam masala
1/4 tsp chili powder
1 tsp grated fresh ginger
2 cloves garlic, minced
1 14.5-oz. can chopped tomatoes, undrained
2 small chili peppers (an Indian variety would be best, I used my SUPER CHILIS because I still have them in the freezer from last year and they’re still hella potent), chopped if you like spice, halved if you don’t
zest of 1 lemon
juice of 1 lemon
salt
chopped cilantro for garnish

Heat oven to 400. Poke holes in eggplant with a fork, then wrap in foil and roast for an hour. Set aside to cool a bit. When you can handle it, cut in half and scoop out the flesh. Mash with a fork and set aside.

Puree the onion in a blender.

Heat oil over medium heat. Add turmeric, coriander, cumin, and garam masala and bloom in the oil for a minute. Add the onion puree and cook, stirring, for 3 minutes. Add the garlic and ginger and stir until it’s reduced to sort of a pumpkin puree-level of consistency. Add the whole can of tomatoes, chili peppers, and lemon zest. Cook for 5 minutes. Add the eggplant and turn the heat to low. Stir and partially cover the pot. Let cook for 10 minutes, stirring occasionally.

Stir in the lemon juice and add salt to taste. (If you went the halved chili route, fish them out now and discard.) Serve over rice and garnish with chopped cilantro.

IF YOU WANT TO MAKE THIS INTO A DIP:
Puree curry in a blender with 1 Tbsp tahini and 3 Tbsp plain yogurt. Serve warm with cilantro garnish and your grain-based or vegetable choice of dipping matter.

Hearth Bread

I made an angry-looking bread.

A photo posted by sarah (@braisinhussy) on

DANG IT ALL TO HECK. This is an old photo of when I made this bread, and NOT the version I made tonight, because that got burnt. I’m annoyed with myself.

Recipe from King Arthur’s Flour. It’s a good bread recipe. Don’t burn it.

Note: this recipe makes two loaves. I’ve made it as one large boule (see above photo), but I like it better in two baguettey shapes.

1 packet active dry yeast or 2 1/4 teaspoons instant yeast
1 Tbsp sugar
1 Tbsp table salt
2 cups lukewarm water
5 1/2 to 6 cups AP flour
oil

Using 5 1/2 cups of flour, mix all the ingredients together in a bowl. Mix thoroughly until the dough pulls away from the side of the bowl. Turn dough out onto floured surface. (I keep the remaining half cup of flour sitting to the side for dusting and extra integration if necessary.)

Knead dough for 5–7 minutes, sprinkling with tiny bits of the reserved half cup of flour when needed. Roll into a ball. Grease the bowl with some oil then use what’s left on your hands to grease the dough ball. Cover and let rise in a warm, draft-free place until doubled, one to two hours.

Line baking sheets with parchment paper (I just used one, but you run the risk of your loaves rising into one another). Turn dough out onto work surface and gently deflate. Cut in half. Shape each half in a sort of long oval. Place on baking sheet. Let rest 5 minutes. During this time, boil some water and adjust your oven racks to the lowest and middle positions.

Slash each top diagonally three times and pat with cold water.

Fill an 8-inch baking dish 1-inch deep with the boiling water. Place on the lowest rack (or if you don’t have a heating coil on the bottom of your oven, place on the floor of the oven).

Slide baking sheet into cold oven. Turn the oven to 450 and set the timer for 30 minutes. Check loaves at 30 minutes, crust should be well browned and the internal temperature at least 190F. May take up to 45 minutes.

Turn off oven, remove baking sheet and carefully remove very hot dish of very hot water. Take the loaves off the baking sheet and return to oven, placing directly on rack. Leave the door ajar and let oven and loaves slowly cool down together. This results in excellent crust (it also results in burnt crust if you close the door, so don’t do that). After about a half hour, remove loaves to a rack to finish cooling. Cool completely before storing.

California Capers (Pickled Nasturtium Pods)

I planted one non-vegetable this year, and that was nasturtiums. They have a very pretty flower! They mostly died horribly in my garden.

My nasturtiums have started to bloom! #gardening #flowers

A photo posted by sarah (@braisinhussy) on

You can already see in the background that a leaf is getting chewed up. Anyway, the reason that I wanted to grow nasturtiums was to make these “California capers,” or pickled nasturtium seedpods.

Backstory: a few years ago, my parents and I spent Christmas in Italy. Our traditional Christmas breakfast is bagels with lox, cream cheese, onions, and capers. We thought we had bought regular capers, but they were way peppery-er and totally awesome. We tried to find them back in the states, and to that end we bought actual pickled peppercorns. It was not those. So I was looking at various things on the web and ran across these.

I’m not sure why they’re called “California,” because surely nasturtiums can grow anywhere, but I guess it’s because the climate of California means they can grow for a really long time (provided they don’t get eaten to death or a drought attacks or whatever). So my nasturtiums only yielded about three pods before they kicked the bucket, but my pal Lydia had a massive plot of them in her front yard, and she very kindly let me rummage through hers to pick enough for pickling.

They’re a bit of an acquired taste, but I do have to say, they’re good on our bagel combination. Still not the same as the ones we found in Florence, though.

2/3 cup nasturtium seedpods (harvest them while green and still on the vine, otherwise they’re too dried out for this to work)
1/4 cup salt
2 cups water
2/3 cup distilled white vinegar
1 teaspoon sugar
1 bay leaf

Rinse the seedpods to remove any bits of dirt that may still be clinging. Combine the salt and water in a container that has a lid (or use plastic wrap). Add the seedpods, stir once or twice, then cover and let brine for 3-4 days. Shake the container or stir the mixture a couple times a day. (They will not smell good. That is normal.)

Strain the seeds and rinse them in a colander. Place the bay leaf in the bottom of a jar and pour the seeds in on top.

Bring the vinegar and sugar to a boil and stir to dissolve. Pour the vinegar mixture carefully into the jar. Close the jar, let cool to room temperature, and then move to the refrigerator. Let them sit for at least a week before using. They’ll keep a long time in the fridge.

Cranberry & Sour Cream Pound Cake

Today's adventure in #baking: cranberry & sour cream #poundcake.

A photo posted by sarah (@braisinhussy) on

Pound cake is a guilty pleasure of mine. I’m really not that much of a dessert fiend, but there’s just something about taking a slice of Sara Lee, wadding the entire thing up and stuffing it in your mouth.

Anyway, this is not a Sara Lee-style pound cake, but it’s veryvery tasty. I got the recipe from a Cook’s Illustrated newsletter and made a couple modifications.

Baker’s Joy or grease+flour
5 large eggs
2 tsp vanilla extract
1 3/4 cup AP flour
1 tsp table salt
1/2 tsp baking powder
1/3 cup sour cream
2 Tbsp milk
14 Tbsp butter
1 1/4 cup white sugar
1 cup cranberries, chopped (fresh or frozen—if using frozen, thawing is unnecessary)
1 Tbsp confectioner’s sugar
dash of table salt

Prep a loaf pan with Baker’s Joy (or grease and flour the pan) and heat oven to 300. Sift flour, baking powder, and salt together in a bowl. Whisk eggs and vanilla together in a separate bowl. Whisk sour cream and milk together in a third bowl. In a fourth bowl, toss cranberries with confectioner’s sugar and a dash of salt.

Put butter in a stand mixer and beat on medium with the paddle attachment until soft, 2–3 minutes, scraping down the bowl as needed. Add sugar and mix until light and fluffy.

Reduce speed to low and add egg mixture, then increase back to medium and mix for a minute, scraping down sides if necessary. (Mixture will look curdled, don’t panic.)

Reduce speed to low and add the flour mixture slowly in three pieces, alternating with the sour cream mixture. Scrape down sides as needed.

Gently fold by hand the cranberries into the batter.

Pour the batter into the loaf pan. Bake for 1 hour 45 minutes to 2 hours, rotating pan after an hour. Test starting at 1:30 with a toothpick (it did take nearly two hours, but I was paranoid about the long cooking time and hey better safe than sorry).

Cool in pan on wire rack for ten minutes. Remove from pan and completely cool on rack before serving.

Honey Cake

honey cake!
honey cake!

I’ve had a cold for the past few days (probably picked up some gunk on the plane ride back), so we pushed our Rosh Hashanah celebratory meal to tonight. A little Braisin’ History—I made honey cake for the first time in 2012, from a recipe on smitten kitchen. It tuned out well that year, but I had moved by the time Rosh Hashanah rolled around in 2013, and I was not yet familiar with how my new oven worked—or rather, how it didn’t. That apartment had a terrible oven. It was at least 75 degrees off, and it would shut off whenever it felt it was approaching a workable temperature. So I baked the cake for the specified amount of time, and then it was raw. As I attempted to get it to a less-gooey state, I managed to burn the edges. I took the failure into work the next day in the hopes that someone would eat it. I ended up throwing most of it away at lunch.

This is not that honey cake, however! This turned out lovely! This is a new recipe I got from the New York Times. It calls for a lot of red wine, olive oil, and (of course) honey. The plum and thyme garnish is really something. I altered a couple things slightly from Melissa Clark’s recipe.

Cake:
2 1/2 cups AP flour (300 grams)
2 tsp baking powder
1/2 tsp baking soda
1 tsp table salt
1 1/2 tsp cinnamon
1 tsp cardamom
1 tsp ground ginger
3 large eggs
1 cup white sugar
1 1/4 cups olive oil
1 cup honey
3/4 cup red wine
2 tsp grated fresh ginger
Baker’s Joy or nonstick spray+flour, to prep the bundt pan

Garnish:
3 plums
2 Tbsp honey
1 Tbsp fresh thyme leaves, chopped
pinch lemon zest

Heat oven to 350, and prep the bundt pan with Baker’s Joy or grease+flour combo.

In a large bowl, whisk together flour, baking powder, baking soda, salt, and spices.

In another large bowl, whisk eggs until frothy. Whisk in sugar, oil, honey, wine, and the fresh ginger until well combined. Stir in dry ingredients and mix until just combined (no pockets of flour remaining, but don’t overwork the batter).

Pour batter into pan and bake until springy to the touch and a cake tester comes out clean, 45 to 50 minutes. Transfer pan to a wire rack to cool for about 20 minutes, then unmold the cake (be brave!) and let cool completely.

While the cake is cooling, make the garnish. Chop up the plums and mix with the honey, thyme, and lemon zest. Macerate for at least 30 minutes.

Slice cake, top with garnish.